
基于 esp8266 芯片的 NodeMCU 开发板,最大的特点是带有 wifi 模块,是一块成本低廉的物联网开发板。
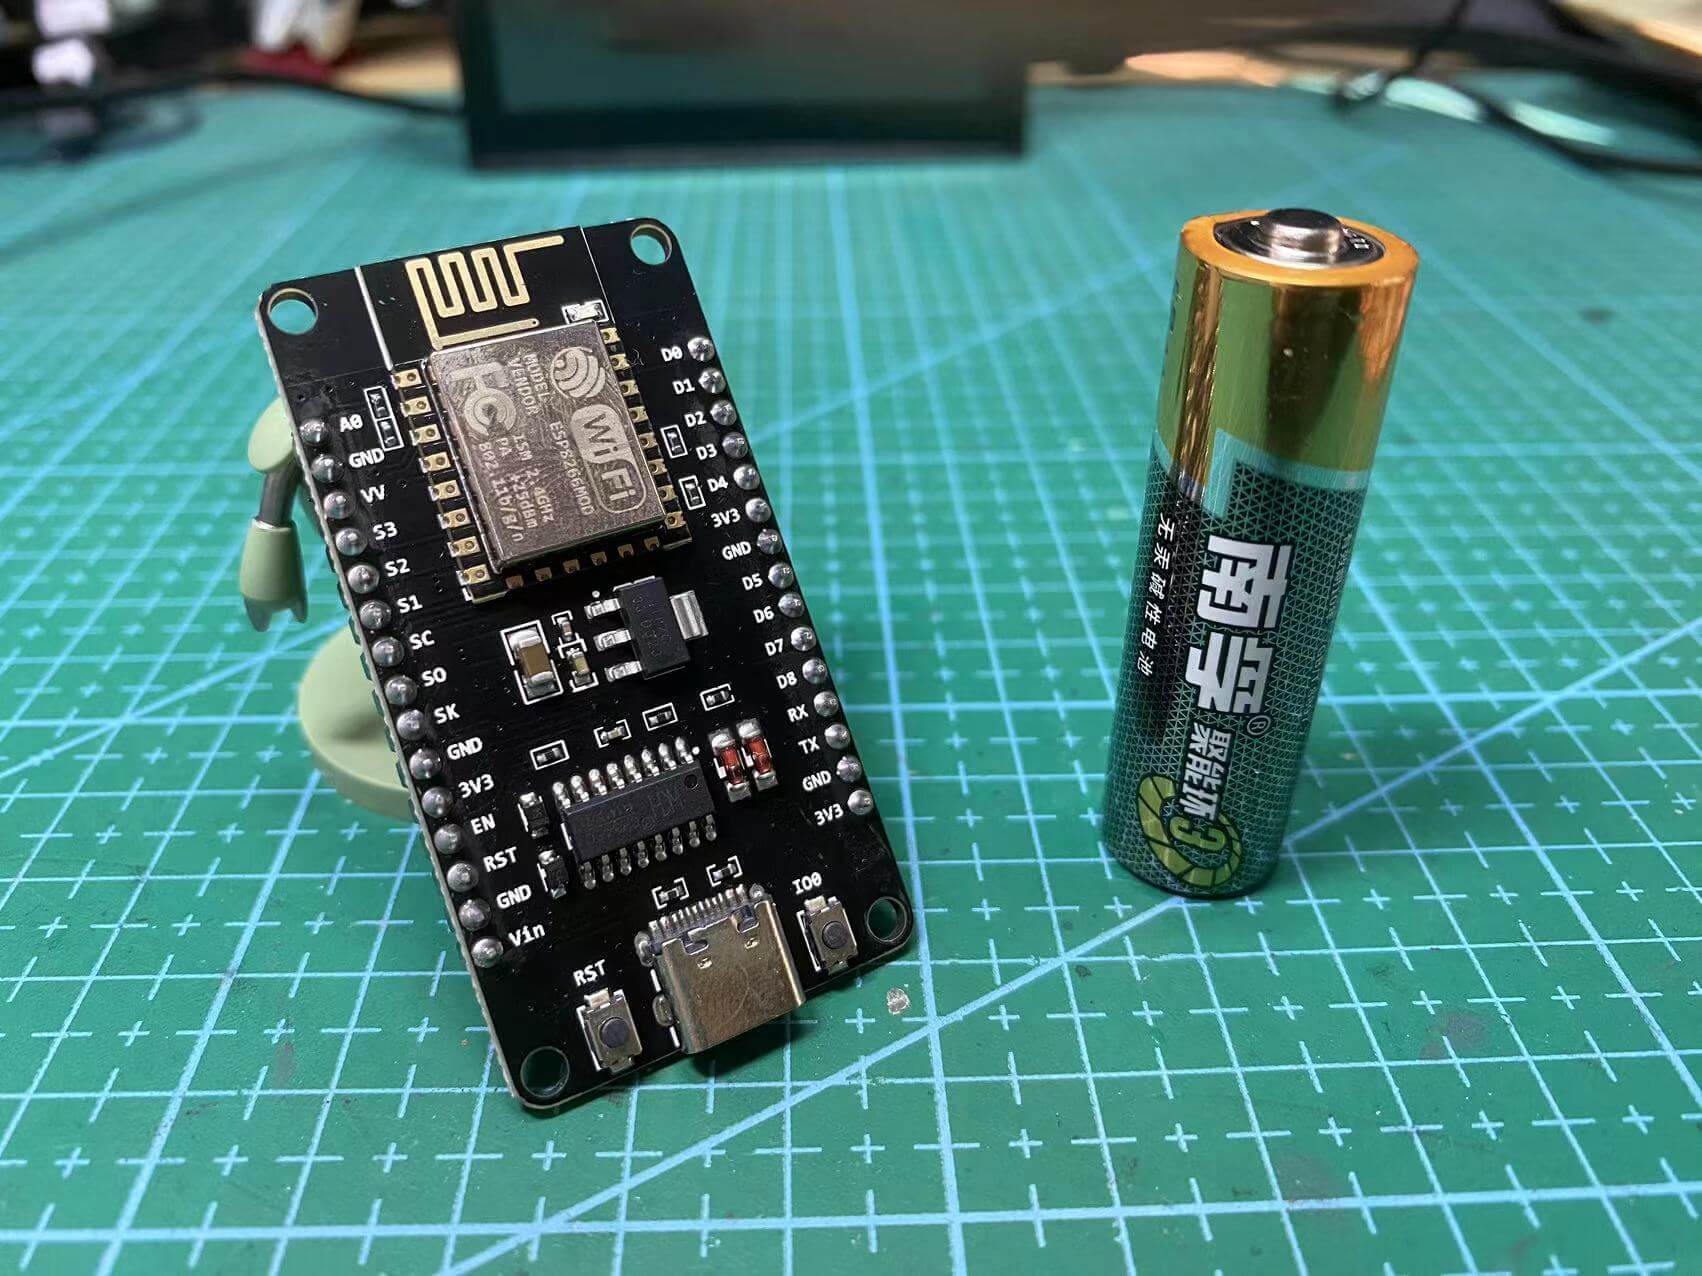
我以12.8元售价买到一块,具有 typeC 接口,支持 CH340 串口(cp2102串口尺寸更小,售价更贵),主要硬件参数包括 50K 的 RAM、512K 的 Flash。对比 arduino nano,售价几乎一致,esp8266体积更大但支持wifi。在开发版上提供静态网站服务有很多作用,比如提供智能家居的操作面板,用siri控制智能家居等等。
找到合适的文件上传方案
开发前提,我使用了 arduino IDE 2.0+,需要安装esp8266插件支持,跑通了例程。
为了上传html文件,我查阅了相关资料 Install ESP8266 Filesystem Uploader in Arduino IDE 发现,通常使用的一种上传方式是采用Serial Peripheral Interface Flash File System (SPIFFS)中文翻译为串行外设接口闪存文件系统,而这种方案已经废弃,相关的arduino IDE插件也无法在2.0版本中使用。
因此我将解决方案转到 LittleFS,一个更现代化的文件系统,为此我们需要对应的 arduino IDE 插件 1.8版本IDE的插件,2.0版本插件参见该项目的说明,作者也提供了,使用时需要结合两个插件的说明来使用。
使用插件上传文件到开发板
以下内容是对上述插件使用方式的整理,具体可以参考插件的说明文件。
安装插件,在 ~/.arduinoIDE/plugins/ 中放入github下载的 vsix 文件,其中 plugins 目录可能要手动创建。重启 IDE。
new 一个 sketch,在项目根目录下创建 data 目录,放入 index.html, index.css, 写入你喜欢的内容。之后按 [Ctrl] + [Shift] + [P], 选择 "Upload LittleFS to Pico/ESP8266"。如无意外的话,data目录内的所有文件将会上传到开发板的根目录,因此在开发板上不存在 data 目录。
启动异步服务器提供文件服务
服务器例程参考自esp8266-webserver-using-littlefs, 具体如下,有修改
使用例程直接编译,遇到没有的库,用 IDE 下载就好了,再次编译直至编译成功,上传程序。
/*
  Title:  ESP8266 Webserver - No Filesystem
  Description:  An ESP8266 webserver that uses LittleFS to load web content
  Author: donsky
  For:    www.donskytech.com
  Date:   September 14, 2022
*/

#include <Arduino.h>
#ifdef ESP32
#include <WiFi.h>
#include <AsyncTCP.h>
#elif defined(ESP8266)
#include <ESP8266WiFi.h>
#include <ESPAsyncTCP.h>
#endif
#include <ESPAsyncWebSrv.h>
#include <LittleFS.h>

/*
  用你家的wifi信息替换下面的中文文字,注意不要填 5G wifi,不支持的
*/
#ifndef STASSID
#define STASSID "这里写wifi名称"
#define STAPSK  "这里写wifi密码"
#endif

const char* ssid = STASSID;
const char* password = STAPSK;


// Webserver
AsyncWebServer server(80);

String PARAM_MESSAGE = "status";

const int LED_PIN = LED_BUILTIN;

void notFound(AsyncWebServerRequest *request)
{
  request->send(404, "text/plain", "Not found");
}

void toggleLED(String status)
{
  if (status == "ON")
    digitalWrite(LED_PIN, LOW);
  else
    digitalWrite(LED_PIN, HIGH);
}

void setup()
{

  Serial.begin(115200);
  Serial.println("Starting the LittleFS Webserver..");

  // Begin LittleFS
  if (!LittleFS.begin())
  {
    Serial.println("An Error has occurred while mounting LittleFS");
    return;
  }

  // Connect to WIFI
  WiFi.mode(WIFI_STA);
  WiFi.begin(ssid, password);
  if (WiFi.waitForConnectResult() != WL_CONNECTED)
  {
    Serial.printf("WiFi Failed!\n");
    return;
  }

  Serial.print("IP Address: ");
  Serial.println(WiFi.localIP());

  // LED PIN
  pinMode(LED_PIN, OUTPUT);
  digitalWrite(LED_PIN, HIGH);

  // Route for root index.html
  server.on("/", HTTP_GET, [](AsyncWebServerRequest *request)
            { request->send(LittleFS, "/index.html", "text/html"); });

  // Route for root index.css
  server.on("/test.css", HTTP_GET, [](AsyncWebServerRequest *request)
            { request->send(LittleFS, "/index.css", "text/css"); });

  // Route for root entireframework.min.css
  // server.on("/entireframework.min.css", HTTP_GET, [](AsyncWebServerRequest *request)
  //           { request->send(LittleFS, "/entireframework.min.css", "text/css"); });

  // Route for root index.js
  // server.on("/index.js", HTTP_GET, [](AsyncWebServerRequest *request)
  //           { request->send(LittleFS, "/index.js", "text/javascript"); });

  // Respond to toggle event
  server.on("/toggle", HTTP_GET, [](AsyncWebServerRequest *request)
            {
        String status;
        if (request->hasParam(PARAM_MESSAGE)) {
            status = request->getParam(PARAM_MESSAGE)->value();
            if(status == "ON"){
              toggleLED("ON");
            }else{
              toggleLED("OFF");
            }
        } else {
            status = "No message sent";
        }
        request->send(200, "text/plain", "Turning Built In LED : " + status); });

  server.onNotFound(notFound);

  server.begin();
}

void loop()
{
}
查看效果
上传成功后打开 IDE 的串行监视器,按一下开发板的复位键,可以看到输出了一个局域网ip地址,访问这个地址,就可以看到我们写的html文件了。